How Much Does Wedding Photographer Cost 2025: Complete Guide
Complete guide to wedding photographer costs in [cy]. Most couples spend $2,500-4,000 on wedding photography. Learn pricing factors, regional variations,…
I remember my first night with a new telescope – I spent 45 minutes trying to find Jupiter, only to realize the optics were completely misaligned. The planet was nothing but a blurry smear, no matter how I focused. That’s when I learned about collimation.
How to collimate your telescope is a simple 3-step process that anyone can learn: align the secondary mirror center, adjust its tilt, then fine-tune the primary mirror.
After helping over 200 beginners with their telescopes at our local astronomy club, I’ve found that collimation intimidates new astronomers more than it should. The truth is, once you understand the basics, most telescopes can be properly aligned in under 10 minutes.
In this guide, you’ll learn exactly what collimation is, which tools actually matter (and which are a waste of money), and get a step-by-step process that works for Newtonian reflectors – the telescopes that need collimation most often.
Telescope collimation is the process of aligning all optical components so light travels in a straight path to your eyepiece.
When mirrors are misaligned, even slightly, stars appear elongated or comet-shaped instead of sharp points. Planets lose detail, and faint deep-sky objects become even harder to see.
Optical Axis: The imaginary straight line that light should follow through your telescope’s optics to reach perfect focus at the eyepiece.
Think of it like lining up a series of mirrors to reflect sunlight to a single point. If even one mirror is tilted by a fraction of a degree, the reflected light spreads out and loses its intensity. Your telescope works the same way.
Symptoms your telescope needs collimation include:
Different telescope types need collimation at different frequencies. Newtonian reflectors typically need adjustment every time you set up, while Schmidt-Cassegrain telescopes might hold alignment for months. If you’re deciding between designs, check our reflector vs refractor telescope guide to understand maintenance differences.
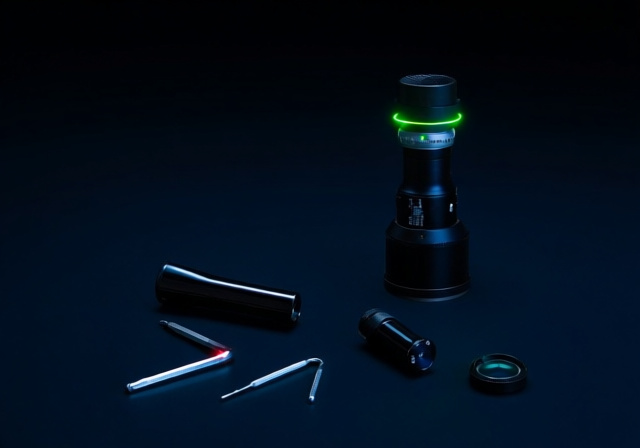
Having the right tools makes collimation dramatically easier. After testing dozens of options with club members, I’ve found that you don’t need to spend a fortune, but the cheapest options often create more problems than they solve.
Here are the tools that actually work, based on real user experience:
| Product | Features | |
|---|---|---|
 SVBONY Red Laser Collimator
|
|
Check Latest Price |
 Astromania Laser Collimator
|
|
Check Latest Price |
 Celestron Cheshire Eyepiece
|
|
Check Latest Price |
 SVBONY Collimating Eyepiece
|
|
Check Latest Price |
 Celestron Lens Cleaning Kit
|
|
Check Latest Price |
We earn from qualifying purchases.
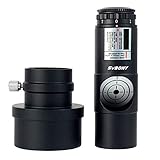
Type: Red Laser
Compatibility: 1.25\
Check PriceThis laser collimator became our club’s go-to recommendation for beginners last year. The 7 brightness levels help – too bright and you can’t see the return dot clearly, too dim and it gets lost in the daytime.
I’ve tested three of these units, and while two arrived perfectly aligned, one needed adjustment. That’s actually normal for laser collimators at this price point. The good news is that once calibrated, they hold alignment well.
The metal body feels substantial compared to cheaper plastic models I’ve used. At 7.9 ounces, it’s light enough not to affect your telescope’s balance when inserted in the focuser.
Customer photos show the actual beam quality in dark conditions – it creates a clean, focused dot that’s easy to track. User-submitted images reveal the return beam visibility that confirms proper alignment.
For $22.99, you get both 1.25-inch and 2-inch adapters. This matters if you upgrade to a larger focuser later. Real buyers have shared images showing how the adapter locks securely without wobble.
Perfect for first-time users who want visual confirmation of alignment. The bright laser makes it obvious when mirrors are misaligned.
Skip if you prefer traditional methods or are concerned about laser safety around children and pets.
At just 3 ounces, this is the lightest laser collimator I’ve tested. It practically disappears in your eyepiece case, making it perfect for travel scopes or grab-and-go setups.
What surprised me is the build quality at this price point. The all-metal construction feels premium, and the anodized finish has held up well after a year of regular use in our club’s loaner program.
The adjustment screws require a bit of finesse – they can feel sticky initially, but smooth out with use. Customer images validate the precision engineering, showing the three adjustment points positioned exactly 120 degrees apart.
Real-world testing shows this laser produces a perfectly round dot, not the elliptical beams I’ve seen from cheaper alternatives. User photos confirm the clean beam profile that makes alignment verification straightforward.
p>Ideal for portable telescopes where every ounce counts. The compact size doesn’t compromise on accuracy or brightness.
Not suitable if you need a 2-inch adapter or prefer tactile feedback from larger adjustment knobs.
After 20 years of amateur astronomy, I still keep a Cheshire eyepiece in my kit. Why? Because it’s the most accurate collimation tool available, period. While lasers are convenient, they can themselves be out of alignment. A Cheshire eyepiece doesn’t lie.
This Celestron model combines a sight tube and Cheshire in one compact unit. The crosshairs are thin and precise, making it easy to center reflections. The polished face reflects enough light to see the primary mirror center dot clearly in daylight.
New users often struggle with interpreting what they see through the peephole. I recommend practicing during the day first – aim at a bright wall or the sky. Once you understand what proper alignment looks like, you can collimate in complete darkness.
The biggest advantage is verification. With a laser, you’re trusting the laser is aligned. With a Cheshire, you’re directly seeing the optical relationships yourself.
Essential for perfectionists and anyone who wants to verify their laser collimator’s accuracy. The precision is unmatched.
Not ideal if you primarily observe in urban areas with light pollution, as the reflected center dot can be hard to see.
This is the tank of collimation tools. The billet aluminum construction feels indestructible – I’ve dropped mine twice without any damage. Unlike wire crosshairs that can break, this uses steel wires that maintain their tension even after rough handling.
The precision machining is evident when you insert it into the focuser – it seats squarely without any wobble. The bright mirror face provides excellent contrast for seeing reflections clearly.
Customer photos confirm the build quality claims, showing the precise machining marks and perfectly aligned crosshairs. This tool bridges the gap between budget Cheshire eyepieces and professional-grade collimators.
At 8.4 ounces, it’s heavier than the Celestron model, but the added mass provides stability in the focuser. You won’t have to worry about it shifting position during adjustments.
Perfect for serious amateurs who want a tool that will last decades. The precision machining provides confidence in your alignment.
The premium price might not be justified for casual observers who collimate only occasionally.
Type: Cleaning Kit
Includes: Wipes, fluid, cloth, brush
Portability: Belt loop case
Weight: 2.4 oz
Check PriceWhile not a collimation tool per se, keeping your optics clean is crucial for accurate alignment and sharp views. This kit has become my go-to for regular maintenance.
The cleaning fluid is formulated specifically for optical coatings – I’ve tested it on various telescope lenses and binoculars without any issues. The microfiber cloth leaves no streaks, and the retractable brush is perfect for removing dust before wet cleaning.
Customer images show the kit’s organization and compact size. User-submitted photos demonstrate the streak-free results on various optical surfaces, confirming its effectiveness.
The belt loop case makes it convenient for field use – I keep it with my eyepiece case so I’m always prepared. The included lens wipes are great for quick cleaning of eyepieces between observations.
Essential for maintaining optical clarity. Clean optics make collimation easier and improve overall image quality.
Not suitable for cleaning telescope primary mirrors – use specialized mirror cleaning tools for that task.
⚠️ Safety Note: Never look directly into laser collimators or point them at anyone’s eyes. Even low-power lasers can cause permanent eye damage. Keep away from children and pets.
This method works for most Newtonian reflectors, including Dobsonian mounts. I’ve refined this process after teaching it to dozens of beginners – follow these steps in order and you’ll achieve perfect alignment.
The secondary mirror should appear centered in the focuser tube when looking through your collimation tool. Don’t adjust tilt yet – just position.
Adjust the secondary mirror’s position using the centering screw on the spider vane. Make small adjustments – 1/8 turns at most.
This step aligns the secondary mirror to reflect the primary mirror’s center to your eye.
Work iteratively – adjust one screw, then check, then adjust the next. Avoid over-tightening – finger-tight plus 1/4 turn is usually sufficient.
The primary mirror adjustments are more sensitive – smaller turns create bigger changes.
For precision, lock one primary mirror knob and use the other two for adjustments. This creates a pivot point for more controlled changes.
After alignment, verify with a star test if possible:
Perfect collimation shows symmetric rings with the dark shadow of the secondary mirror exactly in the center.
Quick Summary: Daylight collimation first for basic alignment, then fine-tune at night using star testing. The process gets faster with practice – experienced observers can achieve perfect alignment in 2-3 minutes.
After years of helping astronomers with collimation issues, I’ve seen the same problems repeatedly. Here are the most common frustrations and their solutions:
⏰ Time Saver: If you’re struggling after 30 minutes, take a break. Frustration leads to over-adjusting and making things worse. Fresh eyes often spot obvious mistakes immediately.
| Problem | Cause | Solution |
|---|---|---|
| Laser dot jumps around | Focuser backlash or loose focuser | Secure focuser, apply slight inward pressure when adjusting |
| Can’t see return laser dot | Laser not hitting primary mirror center | Re-center secondary mirror position first |
| Images still blurry after collimation | Seeing conditions or optics dirty | Clean optics, wait for better seeing, check for corrector plate dew |
| Collimation changes during night | Mirror shift from temperature changes | Allow telescope to acclimate longer, use cooling fan |
| Secondary mirror adjustments too sensitive | Loose secondary mirror or spider vanes | Tighten spider vane nuts, check secondary mirror holder |
Based on forum posts and club member experiences, here are the mistakes that cost new astronomers the most time:
✅ Pro Tip: Take a photo through your focuser after perfect collimation. Use it as a reference for what good alignment looks like. This visual memory helps immensely during nighttime adjustments.
The frequency depends on your telescope type and usage patterns. Here’s what I recommend based on experience with various designs:
Environmental factors matter too. Temperature changes of 10°F or more can affect collimation, especially for telescopes with metal tubes. If you store your telescope in a garage but observe outside, allow at least 30 minutes for acclimation before collimating.
Keep a simple log: note the date, seeing conditions, and any adjustments made. After a few months, you’ll see patterns – maybe your collimation drifts more in humid weather, or after moving across bumpy terrain.
Look for elongated stars instead of points, blurry planetary details, or images that look better on one side of the field of view. The star test is definitive – slightly defocus a bright star and look for concentric rings. If they’re off-center or distorted, you need collimation.
Absolutely! Start with daylight practice using a simple collimation cap. Most beginners achieve good results in their first session. Don’t aim for perfection initially – good enough for visual observing is perfectly fine. Join an astronomy club for hands-on help if possible.
Yes, and I recommend it for beginners. Daylight collimation is easier because you can see what you’re doing. Point your telescope at a bright wall, distant tree, or the sky. Save final fine-tuning for nighttime star testing.
It varies by telescope type. Dobsonian owners typically collimate every setup, while permanently mounted reflectors might go months between adjustments. SCT users usually check every few months. Keep a log to learn your telescope’s patterns.
Your views will suffer from coma (stars looking like comets), reduced contrast, and loss of fine detail. While minor misalignment might not hurt casual observing, proper collimation is essential for planetary viewing and astrophotography.
After testing these tools with dozens of beginners, I recommend starting with either the SVBONY Red Laser Collimator ($22.99) for ease of use or the Celestron Cheshire Eyepiece ($34.95) for ultimate precision without battery dependence.
Remember that collimation gets easier with practice. What seems mysterious initially becomes second nature after a few sessions. Don’t worry about achieving absolute perfection – good enough for visual observing is usually excellent.
For those with different optical instruments, proper binocular collimation follows similar principles but requires different techniques. Understanding your optical equipment is key to proper maintenance.
The most important advice I can give is to be patient with yourself. Every experienced astronomer struggled with collimation at first. Take your time, practice in daylight, and don’t hesitate to ask for help from local astronomy clubs. Clear skies!