Best Cameras For Beginners 2025: 8 Models Tested & Reviewed
Expert reviews of the top 8 beginner cameras tested . From budget-friendly compacts to entry-level full-frame, find your perfect first…
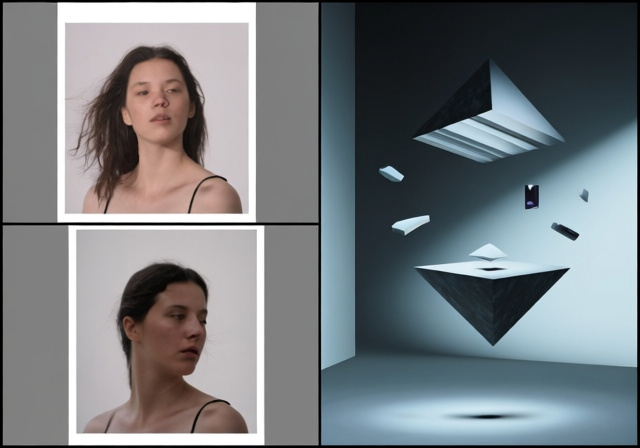
Ever stared at a photograph that seemed to break the laws of physics? A person standing on clouds, animals in impossible locations, or surreal landscapes that couldn’t exist in reality? That’s the magic of composite photography – where imagination meets technical skill to create visual stories that captivate and amaze.
Composite photography is the art of combining multiple photographs to create a single, unified image that tells a unique story. As someone who has spent countless hours mastering this technique, I can tell you it’s one of the most rewarding skills you can develop as a photographer.
After creating over 200 composite images for clients ranging from advertising agencies to fine art galleries, I’ve learned that the key isn’t just technical perfection – it’s about creating images that evoke emotion and wonder while maintaining believable realism.
In this comprehensive guide, you’ll discover 15 creative composite photography ideas, learn the exact workflow professionals use, and avoid common mistakes that plague beginners. Whether you’re looking to create surreal art, enhance your portfolio, or simply explore your creative potential, these techniques will transform your photography from ordinary to extraordinary.
Composite photography is the art of combining multiple photographs or image elements to create a single, cohesive image that appears as one unified scene. This digital technique allows photographers to create impossible scenarios, remove unwanted elements, or enhance visual storytelling by blending different images together seamlessly.
The practice dates back to 1857 when Oscar Gustav Rejlander created “The Two Ways of Life,” combining 32 different negatives into a single masterpiece. Today, with modern software like Photoshop and Affinity Photo, the possibilities are virtually limitless.
What makes composite photography so powerful is its ability to transcend the limitations of a single camera shot. You can perfect lighting after the fact, combine the best moments from multiple frames, or create scenes that exist only in your imagination. This isn’t cheating – it’s artistry that expands your creative toolkit.
For professional photographers, compositing has become an essential skill. Advertising photographers use it to create product shots that would be impossible in reality. Fine art photographers push the boundaries of visual storytelling. Even wedding photographers use compositing to perfect group shots or create artistic montages.
The magic happens when technical skill meets creative vision. I’ve seen beginners create stunning composites within their first month of practice, while some photographers with years of experience still struggle because they focus too much on technique and not enough on storytelling.
Quick Summary: These 15 ideas range from beginner-friendly to advanced, each offering unique creative opportunities. Start with simpler concepts and work your way up as your skills improve.
Quick Summary: Creating a successful composite involves planning, shooting, selecting, blending, and refining. Each step is crucial for achieving believable results.
Before touching your camera, visualize your final image. I always create a rough sketch and identify all elements I’ll need. This planning phase saves hours of editing time later. List every component: background, subject, props, lighting requirements, and perspective needs.
Consider lighting direction first. Will your composite be backlit, side-lit, or flat lit? This determines how you’ll shoot each element. I learned this the hard way after spending three hours on a beautiful composite that looked fake because I ignored shadow direction.
Use a tripod whenever possible. Consistent perspective is your foundation for realistic composites. When shooting elements separately, note your camera height, angle, and lens focal length. Even slight differences in perspective can ruin believability.
Light consistency is crucial. If you’re shooting indoors, use the same lighting setup for all elements. For outdoor composites, shoot at the same time of day or use techniques to match lighting conditions. I once created a sunset scene using elements shot at noon – it took me six hours of color grading to make it work.
Shoot more than you need. Having multiple angles and variations gives you flexibility during editing. I always capture extra background plates and prop options – you never know what you’ll need until you start assembling.
Choose your strongest elements. Look for sharp focus, good lighting, and clean edges. Low-resolution images will stand out in composites, so prioritize quality over quantity.
Organize your layers logically. I use a consistent naming system: background, subject_01, prop_01, effect_01. This becomes essential when working with 20+ layers. Create layer groups for related elements to keep your workspace manageable.
This is where most composites succeed or fail. Use the selection tool that fits your element – quick select for simple shapes, pen tool for precise edges, color range for similar colors.
Refine your selections with feathering. Hard edges scream “fake image.” I typically use 0.5-2 pixel feathering depending on image resolution. For hair or fur, use the select and mask workspace with the refine edge brush.
Create clean layer masks. Never erase parts of your original image – use masks so you can always adjust later. Paint with black to hide, white to reveal, and gray for partial transparency.
Match color temperatures first. Use adjustment layers clipped to each element to harmonize colors. I start with curves adjustment, matching the black, mid, and white points across all elements.
Use blending modes to integrate elements. Screen mode for light effects, multiply for shadows, overlay for texture blending. Experiment with different modes – sometimes unexpected combinations work best.
Match contrast and saturation. Elements from different sources often have different contrast levels. Use curves or levels adjustments to match the tonal range across all elements.
Realistic shadows make or break composites. Study real-world shadows – they’re not black, they’re darker versions of the environment color with reduced saturation.
Create shadow layers with low opacity. I use 20-40% opacity for soft shadows, up to 70% for hard shadows. Use gaussian blur to soften shadow edges based on distance from the casting object.
Match shadow direction across all elements. Inconsistent shadow directions immediately signal a fake composite. Use the same angle for all shadows unless you have multiple light sources.
Add atmospheric effects. Light haze, dust particles, or slight color grading helps blend elements together. These subtle effects make a huge difference in final realism.
Check for tell-tale signs of compositing. Look for halos around selections, mismatched focus points, or inconsistent noise patterns. Zoom out frequently – problems often become obvious when viewing the whole image.
Save iterations. I save versions after each major change. This non-destructive workflow has saved me countless times when clients request changes or I want to try different directions.
✅ Pro Tip: Start with simple projects before attempting complex composites. Master two-element composites first, then gradually add complexity.
⏰ Time Saver: Check these common mistakes before finalizing your composite. Catching them early saves hours of rework.
Different light directions or color temperatures immediately give away a composite. Always analyze your base image’s lighting before adding elements, and match it precisely.
Wrong shadow direction, hardness, or color is a dead giveaway. Remember, shadows are rarely black – they contain colors from the environment and light source.
Halos, jagged edges, or overly sharp cutouts scream “Photoshop.” Use refined edges and appropriate feathering for natural-looking selections.
Elements that don’t follow perspective rules look out of place. Objects appear smaller with distance and less contrast – apply these principles consistently.
Different white balances or color saturation levels break the illusion. Use adjustment layers to harmonize colors across all elements.
All elements at the same distance should have similar sharpness. Use selective blur to create realistic depth of field.
Floating objects without atmospheric interaction look fake. Add appropriate haze, light wrap, or environmental distortion for realism.
| Software | Best For | Cost | Learning Curve |
|---|---|---|---|
| Adobe Photoshop | Professional compositing | $20.99/month | Steep |
| Affinity Photo | Professional alternative | $49.99 one-time | Moderate |
| GIMP | Free option | Free | Steep |
| Canva | Simple composites | $12.99/month | Easy |
For beginners, I recommend starting with Affinity Photo. It offers professional-level capabilities without the subscription cost of Photoshop. As you advance, the investment in Photoshop becomes worthwhile for its advanced features like content-aware fill and neural filters.
A classic example is a person floating in mid-air, created by photographing someone on a hidden support and then removing the support digitally. Another example is combining a perfect sky from one photo with a landscape from another, or placing multiple versions of the same person in one frame for storytelling effect.
A good composite image maintains consistent lighting, perspective, and scale across all elements. It has clean selections without halos, realistic shadows, and proper color harmony. Most importantly, it tells a coherent story or creates an emotional impact. Technical perfection serves the artistic vision – the best composites make viewers forget they’re looking at combined images.
Plan your concept before shooting, use a tripod for consistent perspective, match lighting across all elements, and shoot with higher resolution than needed. Focus on getting clean separation between subject and background, and capture multiple variations of each element. During editing, pay attention to selection quality, color matching, and realistic shadow creation.
Adobe Photoshop remains the industry standard for professional compositing with its advanced selection tools and layer capabilities. Affinity Photo offers a powerful one-time purchase alternative. GIMP provides free options for those on a budget. For simple composites, Canva works well. Choose based on your budget, skill level, and intended complexity.
A traditional photograph captures a single moment in reality as seen through the camera lens. A composite image combines elements from multiple photographs to create a new image that didn’t exist in reality. While photos document what was, composites create what could be – expanding creative possibilities beyond physical limitations.
Start with a clear concept and plan all elements. Use consistent lighting and perspective when shooting. Create clean selections with proper feathering. Match colors, contrast, and saturation across all elements. Add realistic shadows and atmospheric effects. Finally, apply subtle color grading to unify everything. Practice with simple two-element composites before attempting complex scenes.
No, composite photography is not cheating when presented honestly. It’s a legitimate art form that extends photography’s creative possibilities. The key is transparency – clearly label composites as such when appropriate. Photography has always involved manipulation, from darkroom techniques to digital editing. Composite work is simply another tool in the artist’s toolkit.
Composite photography opens up infinite creative possibilities limited only by your imagination. Whether you’re creating surreal art for gallery exhibitions, enhancing your commercial portfolio, or just exploring personal projects, these techniques will elevate your work beyond conventional photography.
Remember, every professional was once a beginner. Your first composites might not be perfect, but each project teaches valuable lessons. I still look back at my early attempts and smile – they weren’t technically perfect, but they started me on this creative path.
For those looking to expand their technical skills further, check out our comprehensive night photography techniques guide, which covers many advanced camera settings that apply to composite work.
Ready to start creating? Begin with simple two-element composites and gradually increase complexity as your skills improve. Join photography communities for feedback, study the work of masters, and most importantly, keep experimenting with new ideas and techniques.
The world of composite photography awaits – your impossible worlds are waiting to be brought to life. Start creating today and discover where your imagination can take you.
For more photography guides and tutorials, explore our complete collection of photography guides and tutorials covering everything from basic techniques to advanced artistic concepts. Learn more about our photography background and approach to visual storytelling.