Can You Look at a Lunar Eclipse? Complete 2026 Safety Guide
Yes, lunar eclipses are completely safe to view with naked eye. Learn why lunar eclipses won't damage your vision vs…

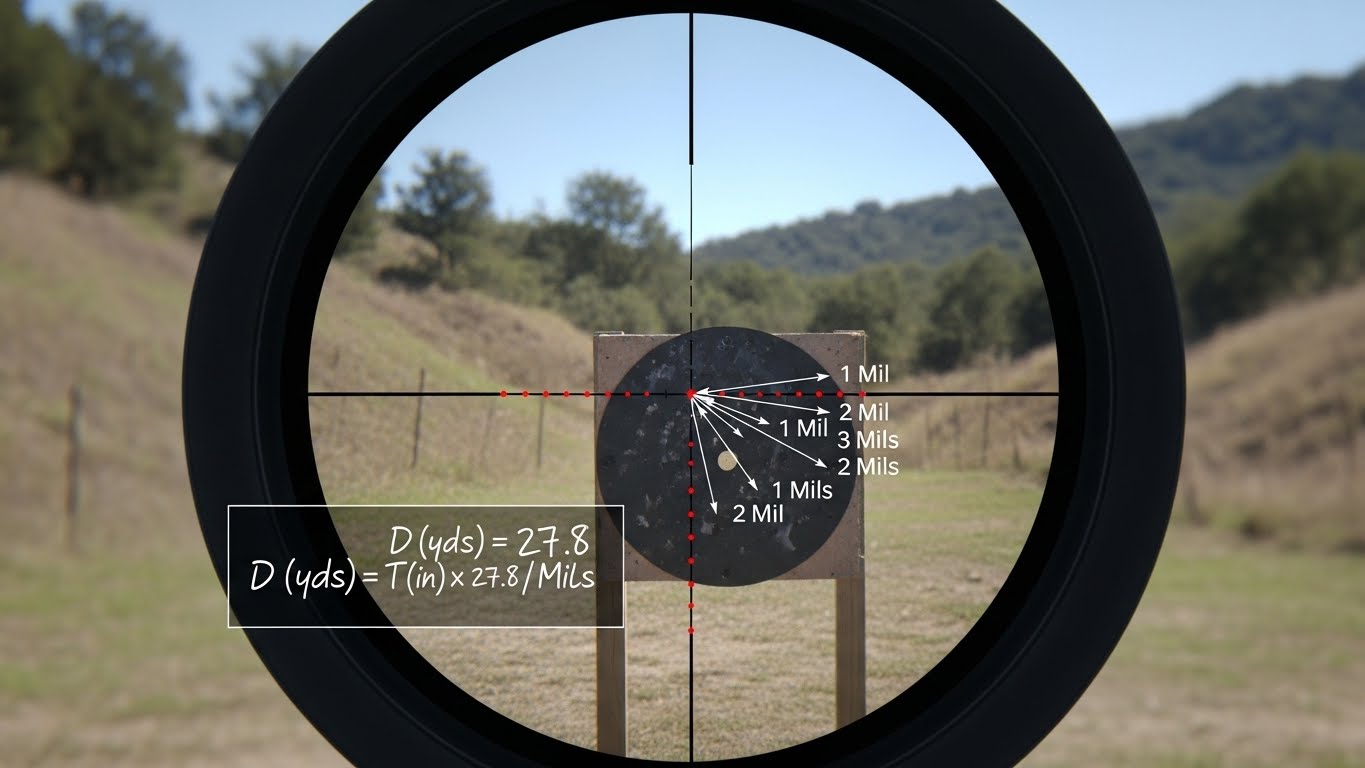
Ever found yourself staring through a rifle scope at a distant target, wondering exactly how far away it is? You’re not alone. I’ve been in that exact situation countless times – perched on a ridge with a trophy buck in view, needing to make that critical shot. That’s where mil-dot reticles become invaluable tools in your shooting arsenal.
Mil-dot explained simply: it’s a precise mathematical system built into your scope that lets you estimate distance and make accurate adjustments without any electronics. This angular measurement system, developed for military applications, has become the standard for precision shooters worldwide who need reliable distance estimation when technology fails or batteries die.
After spending over 15 years teaching long-range shooting, I’ve seen countless shooters struggle with mil concepts. The confusion usually comes from overcomplicating what’s actually a straightforward system. In this guide, I’ll break down everything you need to know in plain English, with practical examples you can use immediately at the range.
Here’s what we’ll cover: understanding what mils actually are, how to make accurate range calculations, choosing the right scope configuration, common mistakes that cost shooters shots, and practical field applications that build confidence. Let’s dive into the world of milliradians and transform how you approach long-range shooting.
A mil-dot reticle is a crosshair pattern featuring dots spaced at precise milliradian intervals. Each dot represents 1/10th of a mil, with the full space between dot centers equaling exactly 1 milliradian. This grid pattern transforms your scope into a rangefinding tool and aiming reference system.
Think of a milliradian as a slice of a circle – specifically, 1/1000th of a radian. At 100 yards, one mil spans exactly 3.6 inches. At 1000 yards, that same mil spans 36 inches. This consistent mathematical relationship is what makes mil-dot systems so powerful for distance estimation.
The beauty of mils lies in their relationship with the metric system. One mil equals 10 centimeters at 100 meters, making calculations incredibly intuitive for those comfortable with metric measurements. This consistency across distances means your mil measurements remain proportional regardless of range.
Milliradian (MRAD): An angular measurement equal to 1/1000th of a radian, or approximately 3.6 inches at 100 yards. It’s the foundation of the mil-dot system and provides a mathematical framework for range estimation.
Unlike traditional crosshairs, mil-dot reticles give you multiple reference points for both elevation and windage adjustments. The dots serve as precise aiming points for holdover and holdoff, while the spaces between them provide reference for measuring targets and estimating distance.
Modern mil-dot reticles have evolved beyond the simple dot pattern. Today you’ll find variations with hash marks, Christmas tree patterns, and illuminated elements. But they all operate on the same mathematical principle – consistent angular measurement that scales with distance.
The key to mastering mil-dot systems is understanding how angular measurements translate to real-world distances. This relationship remains constant: one mil always represents the same angle, but the physical distance it covers increases proportionally with range.
At 100 yards, one mil spans 3.6 inches. Double the distance to 200 yards, and one mil spans 7.2 inches. This linear relationship continues through all distances – at 1000 yards, one mil spans 36 inches. This predictable scaling makes distance calculations straightforward once you understand the formula.
Quick Summary: One mil equals 3.6 inches at 100 yards, 10 centimeters at 100 meters, and scales proportionally with distance. This consistent relationship allows for accurate range estimation using the mil-dot formula.
Here’s a comprehensive mil measurement reference table that I keep taped to my range bag:
| Distance | 1 Mil = | 0.1 Mil = | 0.5 Mil = |
|---|---|---|---|
| 100 yards | 3.6 inches | 0.36 inches | 1.8 inches |
| 200 yards | 7.2 inches | 0.72 inches | 3.6 inches |
| 300 yards | 10.8 inches | 1.08 inches | 5.4 inches |
| 400 yards | 14.4 inches | 1.44 inches | 7.2 inches |
| 500 yards | 18.0 inches | 1.80 inches | 9.0 inches |
| 600 yards | 21.6 inches | 2.16 inches | 10.8 inches |
| 700 yards | 25.2 inches | 2.52 inches | 12.6 inches |
| 800 yards | 28.8 inches | 2.88 inches | 14.4 inches |
| 900 yards | 32.4 inches | 3.24 inches | 16.2 inches |
| 1000 yards | 36.0 inches | 3.60 inches | 18.0 inches |
For metric users, the calculations are even simpler: one mil equals 10 centimeters at 100 meters, 20 centimeters at 200 meters, and so on. This clean 10:1 ratio is why many competitive shooters prefer metric measurements when working with mil systems.
Understanding these measurements is crucial because they form the foundation of all mil-dot calculations. When you can instantly recall that one mil equals 18 inches at 500 yards, you’re ready to make quick, accurate adjustments in the field.
Using mil dots effectively requires mastering two key skills: range finding and holdover/holdoff adjustments. Let me walk you through both processes with practical examples I’ve used with hundreds of students.
The fundamental mil-dot formula for range estimation is simple but powerful:
Range Formula: Distance (yards) = (Target Size in inches × 27.78) ÷ Mil Reading
Range Formula (Metric): Distance (meters) = (Target Size in centimeters × 10) ÷ Mil Reading
Here’s how to apply it in practice:
I’ve found that creating a quick reference card with common target sizes eliminates most calculation errors in the field. Keep it simple: deer (18″ chest), coyote (15″ back), prairie dog (8″ body), human (40″ height). These measurements cover most hunting scenarios.
Once you know the distance, use mil dots for bullet drop compensation. Here’s my practical approach:
First, know your rifle’s ballistics. A .308 Winchester with 168-grain match ammo typically drops about 3 mils at 500 yards. Rather than dialing turrets, you can simply hold 3 mils high using your reticle.
Practice these holds at the range until they become second nature:
These values vary by cartridge and load, so create your own dope card based on actual shooting. The key is practicing with your specific rifle and ammunition until the holds are instinctive.
Mil dots excel for wind holds too. A common rule of thumb: a 10 mph crosswind typically deflects a .308 bullet about 0.5 mils at 500 yards. Simply hold that amount into the wind using your horizontal mil references.
Wind reading is an art that develops with experience. Start with basic wind holds and refine them through practice. Keep a log of wind conditions and their effects on your bullets – this data becomes invaluable in the field.
The type of scope you have dramatically affects how mil dots function. Understanding first focal plane (FFP) versus second focal plane (SFP) is crucial for accurate mil usage.
FFP scopes place the reticle in front of the magnification lens assembly. This means the reticle grows and shrinks with the target as you change magnification. The beauty of FFP is that your mil measurements remain accurate at any magnification setting.
I’ve tested dozens of FFP scopes, and they’re ideal for mil-dot users because you can range targets at 4x, 8x, or 12x power – the mil measurements stay consistent. This flexibility proves invaluable when targets appear at different sizes and distances.
The main drawback? At low magnification, the reticle can appear thick and obscure small targets. However, modern FFP scopes have addressed this with thinner reticle designs and illuminated elements.
SFP scopes position the reticle behind the magnification lens. The reticle stays the same size regardless of magnification, which many shooters prefer for clarity. However, this creates a critical limitation: mil measurements are only accurate at one specific magnification, usually the highest power.
If you have an SFP scope, you MUST remember to use it at the correct magnification for ranging. I’ve seen students make this mistake repeatedly – they’ll range a target at 6x when their scope is calibrated for 12x, resulting in significant distance errors.
⏰ Time Saver: Mark your SFP scope’s ranging magnification with a small dot of paint. This visual reminder ensures you’ll always use the correct power for mil measurements.
For serious mil-dot users, I recommend FFP scopes despite their higher cost. The ability to range accurately at any magnification outweighs the reticle thickness concerns. Plus, modern FFP designs have largely solved the visibility issues.
If you’re using an SFP scope, make it a habit to always range at the correct magnification. Create a pre-shot checklist: target identification, distance estimation at calibrated power, then adjust magnification as needed for the shot.
The debate between mil and MOA systems has raged for decades. Both work perfectly when used correctly – the key is choosing one system and mastering it. Here’s my experience-based comparison:
| Factor | Mil System | MOA System |
|---|---|---|
| Mathematical Base | Base 10 (metric-friendly) | Base 60 (traditional) |
| Adjustment Precision | 0.1 mil = 0.36″ at 100 yards | 0.25 MOA = 0.25″ at 100 yards |
| Calculation Simplicity | Easier with metric measurements | Easier with imperial measurements |
| Industry Adoption | Military and competitive shooting | Hunting and traditional shooting |
| Learning Curve | Moderate | Moderate |
I shoot both systems regularly, but I prefer mils for several reasons. The base-10 math makes calculations intuitive, especially when working with metric distances. Most tactical competitions use mils, so practicing with one system across all applications builds consistency.
However, MOA has its advantages too. The finer adjustments (0.25 MOA clicks) offer slightly more precision, and many American shooters find the imperial calculations more familiar. Many hunting scopes still use MOA systems.
My recommendation: choose based on your primary application. For tactical shooting or competition, go with mils. For hunting in the US, MOA might feel more natural. The key is committing to one system and practicing until it becomes second nature.
After teaching hundreds of shooters, I’ve identified the same mistakes that cost shooters accuracy. Here are the most common errors and how to fix them:
The biggest source of ranging errors is guessing target size. I’ve seen shooters estimate a deer’s chest at 24 inches when it’s actually 18 inches – a 33% error that translates to major distance miscalculations.
Solution: Research your quarry’s actual measurements. Create a field guide with real dimensions for the animals you hunt. When in doubt, use conservative estimates – it’s better to think a target is closer than it actually is.
This mistake happens constantly. A shooter ranges a target at 6x when their SFP scope is calibrated for 12x, resulting in 50% distance errors.
Solution: Always verify your magnification before ranging. Create a habit: identify target, check magnification setting, then range. Many shooters mark their scope’s calibrated power with paint or tape as a visual reminder.
In hunting situations, shooters often make calculation errors when adrenaline is high. I’ve watched hunters forget the entire mil formula when a trophy animal appears.
Solution: Practice until calculations become automatic. Create cheat sheets with common scenarios pre-calculated. Use smartphone apps to verify calculations when time permits. The goal is muscle memory – you should be able to estimate distance without conscious thought.
Mil-dot ranging assumes perfect conditions, but the real world introduces variables: uphill/downhill angles, mirage, and target orientation all affect measurements.
Solution: Practice in various conditions. Learn to compensate for angles (generally hold slightly low for uphill/downhill shots). Account for mirage by waiting for stable conditions or using mirage as a wind indicator rather than trying to range through it.
Many shooters learn mil basics but never practice regularly. Skills fade without consistent reinforcement.
Solution: Dedicate practice time specifically to mil-dot skills. Start each range session with ranging exercises at known distances. Use targets of varying sizes to practice estimation skills. Keep a log of your ranging accuracy and work to improve it.
While laser rangefinders have largely replaced mil-based ranging for hunting, mil dots remain invaluable tools. I’ve taught military snipers, competitive shooters, and hunters how to leverage mil dots in practical scenarios.
Modern hunters often carry laser rangefinders, but electronics fail. Batteries die, devices get damaged, or situations don’t allow for laser use. In these moments, mil-dot skills become essential.
For hunting, focus on quick estimation rather than precision calculations. Memorize common target sizes and their mil readings at typical hunting distances. A whitetail at 200 yards might measure 2.5 mils – recognizing this pattern instantly tells you the range without complex math.
Practice with silhouettes of game animals at the range. Set targets at unknown distances, estimate using mils, then verify with a rangefinder. This builds the pattern recognition skills you’ll need in the field.
Competitive shooters use mil dots for rapid target engagement and precise adjustments. In PRS and similar competitions, you might need to engage multiple targets at different distances quickly.
Develop a system for target transitions: range, calculate required holds, engage, move to next target. Practice this sequence until it becomes fluid. Many competitive shooters use data cards with pre-calculated holds for common distances.
The key advantage in competition is speed. While others are fumbling with rangefinders, you can engage targets using your reticle. This efficiency often makes the difference between winning and placing.
In tactical situations, mil dots provide silent, electronics-free ranging and adjustments. Military snipers master these skills because batteries fail and electronics emit detectable signals.
Tactical training emphasizes speed and accuracy under pressure. Practice ranging moving targets, calculating leads, and adjusting for environmental factors. Develop a systematic approach that works consistently even when stress levels are high.
One valuable tactical skill is using mil dots for observation and reconnaissance. The reticle can measure object sizes, calculate distances to landmarks, and provide intelligence without additional equipment.
Remember that practical application differs from theory. Real-world shooting introduces variables that range sessions can’t replicate. Practice in conditions that simulate your intended use – hunters should practice from field positions, competitors should practice under time pressure, tactical operators should practice with gear and stress.
Once you’ve mastered the basics, these advanced techniques will enhance your mil-dot proficiency. I’ve developed these methods through years of practical application and teaching.
When you have multiple targets at different distances, use your reticle to measure them simultaneously. For example, if one target spans 2 mils and another spans 1.5 mils, and you know they’re the same size, you can quickly calculate their relative distances.
This technique proves invaluable in hunting and competitive scenarios where time matters. Practice with multiple targets of known sizes to develop this skill.
Mil dots help calculate leads for moving targets. The formula varies by target speed and angle, but a starting point is 1 mil lead for a walking target at 300 yards.
Practice with moving targets at the range. Use consistent speeds and distances to build a reference database. Start with simple crossing shots, then progress to angled and varying speeds.
Uphill and downhill shots require adjustments to your mil calculations. The general rule: reduce your distance estimate by 5-10% for angles over 30 degrees.
Practice on slopes to understand how angles affect your measurements. Use inclinometers or scope-mounted angle indicators until you develop a feel for the adjustments.
Beyond basic wind holds, you can use mil dots to measure wind speed and direction. Observe how mirage flows through your reticle – each mil of mirage drift roughly indicates wind speed.
Practice reading mirage and grass movement through your scope. Create a reference chart correlating mil observations with actual wind measurements. This skill takes time to develop but dramatically improves your long-range accuracy.
In dawn and dusk conditions, mil dots become harder to see. Modern illuminated reticles help, but you can also use target edges and contrast to estimate measurements.
Practice in low light conditions to understand your scope’s limitations. Note when your reticle becomes difficult to see and develop alternative reference points for ranging in poor light.
✅ Pro Tip: Create a mil-dot logbook to document your shots, calculations, and results. Review this data regularly to identify patterns and improve your estimation accuracy.
One mil dot equals exactly 3.6 inches at 100 yards. This measurement is consistent and forms the foundation of all mil-dot calculations. At 100 yards, the space between mil-dot centers spans 3.6 inches, while each dot represents 0.1 mil or 0.36 inches.
Neither system is inherently better – both work perfectly when used correctly. Mil systems offer simpler math with metric measurements (1 mil = 10 cm at 100m), while MOA provides finer adjustments (0.25 MOA = 0.25 inch at 100 yards). Choose based on your primary application and stick with one system for consistency.
0.1 mil equals 0.36 inches at 100 yards. This is typically the smallest increment on mil-dot turrets and represents one click of adjustment. At 500 yards, 0.1 mil equals 1.8 inches, making it a precise adjustment system for long-range shooting.
One mil dot varies in physical size based on distance: 3.6 inches at 100 yards, 7.2 inches at 200 yards, up to 36 inches at 1000 yards. In metric, it’s exactly 10 centimeters at 100 meters and scales proportionally with distance. This consistent angular relationship makes mil dots perfect for range estimation.
A mil-dot is a rifle scope reticle featuring dots spaced at 1-milliradian intervals. It serves as both a rangefinding tool and aiming reference system. The dots and spaces between them provide a grid for measuring targets, estimating distance, and making precise adjustments for bullet drop and wind drift.
Mil dots work by measuring the angular size of targets. Since 1 mil equals 3.6 inches at 100 yards, you can calculate distance by dividing a target’s known size by its mil measurement in your reticle. The formula is: Distance = (Target Size × 27.78) ÷ Mil Reading. This mathematical relationship allows accurate range estimation without electronics.
Yes, but only at the scope’s calibrated magnification, usually the highest power. On SFP scopes, mil measurements are only accurate at one specific magnification setting. Always verify your scope’s ranging power and use it consistently for accurate mil-based calculations.
Mil-dot ranging can be quite accurate (within 5% with practice) but generally less precise than quality laser rangefinders (typically within 1 yard). However, mil dots work when electronics fail, require no batteries, and provide instant ranging without additional equipment. Many serious shooters master both systems.
Mil-dot mastery comes through deliberate practice and real-world application. I’ve taught hundreds of shooters, and those who succeed share one trait: consistent practice with a purpose. They don’t just shoot – they analyze, adjust, and improve systematically.
Start with the basics at the range. Set targets at known distances and practice ranging them using your mil-dot reticle. Compare your estimates to actual distances and identify patterns in your calculations. Keep detailed notes of your performance and review them regularly.
Create practice drills that simulate real scenarios. For hunters, practice quick estimations of deer-sized targets at various distances. Competitors should work on rapid transitions between multiple targets. Tactical operators need to master stress-induced calculations and time pressure.
Invest in quality training resources beyond this guide. Books like “The Long Range Shooting Handbook” and “Precision Rifle Marksmanship” offer detailed instruction. Consider formal training from qualified instructors – there’s no substitute for hands-on coaching.
Remember that mil-dot skills, like all shooting abilities, degrade without practice. Set aside regular time for maintenance training, even during off-seasons. Dry-fire practice with your scope can maintain your estimation skills when live fire isn’t possible.
The modern shooting world offers amazing technology – laser rangefinders, ballistic calculators, and smart scopes. But mil-dot knowledge remains valuable. It provides a backup when electronics fail, develops deeper understanding of ballistics, and connects you to the mathematical foundations of marksmanship.
Mil dots aren’t just a reticle pattern – they’re a complete system for understanding and mastering long-range shooting. Master this system, and you’ll join the ranks of shooters who can reliably hit targets at distance regardless of technology or conditions. The journey takes time and dedication, but the confidence and capability gained are worth every hour of practice.
Ready to put these skills into action? Check out our Best Scope for Savage 220 guide for practical applications of mil-dot reticles in hunting scenarios, or explore our Best Scopes for 6.5 Creedmoor recommendations for long-range precision shooting opportunities.