Light Photography Ideas: 15+ Techniques for Stunning Photos
Master the art of light photography with 15+ creative techniques using natural light, simple setups, and dramatic effects. Transform your…
After spending 15 years helping jewelry makers and e-commerce stores capture stunning product photos, I’ve learned that great jewelry photography doesn’t require a fortune in equipment—it just needs the right techniques and a bit of creativity. Whether you’re shooting with a professional DSLR or your iPhone, these photography tips and guides will transform your jewelry photos from lackluster to luminous.
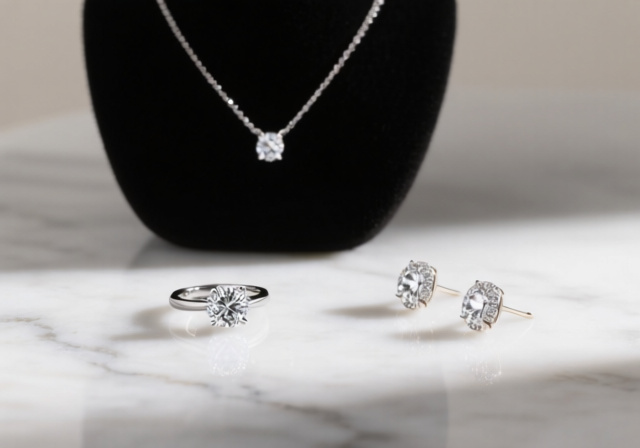
Jewelry photography is the art of capturing small, reflective objects with proper lighting and composition to showcase their details and appeal. The secret to successful jewelry photography lies in controlling reflections, maximizing sharpness, and creating compositions that highlight each piece’s unique beauty.
This comprehensive guide covers everything from basic smartphone techniques to professional studio setups, with over 20 creative ideas you can implement immediately. We’ll explore budget-friendly solutions that deliver professional results, address common pain points like managing reflections on shiny surfaces, and provide step-by-step instructions for every skill level.
Unlike other product photography, jewelry presents a perfect storm of challenges that can frustrate even experienced photographers. The tiny size requires extreme precision, while reflective surfaces create lighting nightmares. I’ve seen countless photographers give up after hours of failed attempts, but understanding these challenges is the first step toward mastering jewelry photography.
Size matters when you’re dealing with objects smaller than your fingernail. Macro photography at this scale reveals every dust particle, every fingerprint, and every tiny imperfection. Depth of field becomes razor-thin, sometimes measuring just millimeters. This means critical focus becomes absolutely essential, and even the slightest camera movement can ruin an otherwise perfect shot.
Reflections are perhaps the biggest challenge. Metals act like mirrors, gemstones refract light in unpredictable ways, and curved surfaces create distorted reflections of everything in the room. I once spent three hours trying to photograph a silver necklace without capturing my own reflection in every shot. The solution isn’t expensive equipment—it’s understanding how light interacts with these surfaces.
Jewelry photography is crucial for e-commerce sales, brand presentation, and customer trust, as it directly impacts purchase decisions and perceived value. Studies show that high-quality jewelry photography can increase conversion rates by up to 30%, making it a non-negotiable investment for serious sellers.
You don’t need a professional studio setup to capture stunning jewelry photos, but having the right equipment makes the process significantly easier. Based on my experience testing dozens of setups ranging from $50 DIY solutions to $5000 professional rigs, here’s what actually matters.
Camera Options: While a DSLR or mirrorless camera with manual controls gives you the most flexibility, don’t discount modern smartphones. The iPhone 16 Pro and recent Android phones can capture excellent jewelry photos when used correctly. If you’re using a dedicated camera, any model from the last 5 years will work—focus more on your lens choice than the camera body.
Lens Recommendations: A true macro lens is game-changing for jewelry photography. The Canon EF 100mm f/2.8L or Nikon 105mm f/2.8 are industry standards, but budget options like the Tokina 100mm f/2.8 deliver comparable results for half the price. Macro lenses allow 1:1 magnification, meaning you can capture life-sized images of tiny details. If you’re on a tight budget, extension tubes or close-up filters can transform your existing kit lens into a macro-capable setup.
Lighting Equipment: Soft, diffused lighting is non-negotiable for jewelry. A light tent (also called a photo cube or light box) is the single most valuable investment you can make—prices range from $20 for basic models to $200 for professional versions. Alternatively, two softboxes positioned at 45-degree angles create beautiful, shadow-free lighting. For natural light shooters, a north-facing window provides consistent, diffused light throughout the day.
Support and Stability: A sturdy tripod is essential for sharp jewelry photos. Look for one with a center column that can reverse for low-angle shots. Remote shutter releases or your camera’s self-timer eliminate camera shake during long exposures. For extreme precision, consider a focusing rail—these allow micro-adjustments without moving your entire setup.
| Equipment Category | Budget Option (Under $100) | Mid-Range ($100-500) | Professional ($500+) |
|---|---|---|---|
| Camera | Modern smartphone with manual mode | Entry-level DSLR/mirrorless (Canon Rebel, Nikon D3500) | Full-frame camera (Canon R5, Sony A7R IV) |
| Lens | Extension tubes + kit lens | Dedicated macro lens (Tokina 100mm) | Pro macro lens (Canon 100mm L, Nikon 105mm) |
| Lighting | DIY light tent + desk lamps | Professional light tent + LED panels | Studio strobes + softboxes |
| Support | Basic tripod + self-timer | Heavy-duty tripod + remote shutter | Copy stand + focusing rail |
Budget-Friendly DIY Solutions: Some of my best jewelry photos were captured with DIY equipment. Create a light tent from a cardboard box and tracing paper, use white foam board as reflectors, and make your own props from household items. A piece of white poster board makes an excellent seamless background, while a simple black velvet scarf creates dramatic contrast for silver jewelry.
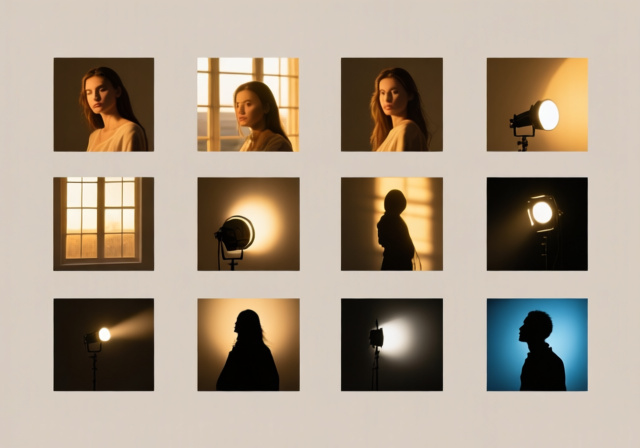
Lighting is everything in jewelry photography. After testing countless setups over the years, I’ve found that the best lighting techniques balance three key elements: softness to minimize harsh reflections, direction to create dimension, and diffusion to preserve detail. Here’s how to master jewelry lighting regardless of your budget.
Natural Light Window Setup: My go-to setup for beginners uses nothing more than a north-facing window and a white foam board. Position your jewelry table 2-3 feet from the window, with the foam board on the opposite side to bounce light back into shadows. This creates soft, directional light that makes diamonds sparkle without creating harsh glare. The best time to shoot is mid-morning or mid-afternoon when the light is consistent but not directly overhead.
Two-Light Studio Setup: For consistent results any time of day, set up two lights at 45-degree angles to your jewelry. Use softboxes or diffusion panels to create large light sources—remember, the larger the light source relative to your subject, the softer the shadows. Position your main light slightly higher than your jewelry, with the fill light at the same height but lower intensity. This setup creates dimension while preventing harsh shadows.
Light Tent Technique: A light tent creates an environment of soft, diffused light that eliminates reflections and creates consistent lighting. Place your jewelry inside the tent, then position lights on opposite sides. For best results, use two lights of equal intensity to create shadow-free illumination that’s perfect for e-commerce. The tent walls act as giant reflectors, bouncing light around to fill every shadow.
Light Tent: A portable cube with translucent walls that creates soft, diffused lighting by surrounding your subject with light. Essential for eliminating reflections on shiny jewelry surfaces.
Managing Reflections: Reflective jewelry requires special lighting techniques. Instead of trying to eliminate all reflections, learn to control them. Use black cards (called gobos) to create intentional dark reflections that define edges and shapes. For highly reflective pieces, try the “black tent” technique—cover the inside of your light tent with black fabric except for one small opening where you’ll position your light.
Diamond and Gemstone Lighting: Capturing the sparkle of gemstones requires strategic light placement. Position one light source at a 45-degree angle to create sparkle (specular highlights), then add a secondary light from the opposite direction to illuminate the stone’s interior. For maximum sparkle, try side-lighting with a small, focused light source like a bare LED or a spotlight with a snoot.
Lighting Setup Diagram:
Great composition transforms good jewelry photos into great ones. Through years of experimentation and studying top jewelry photographers, I’ve compiled these 20+ composition ideas that work for any type of jewelry and skill level. The key is balancing creativity with consistency—especially for e-commerce where uniformity matters.
1. The Classic Hero Shot: Place your jewelry against a clean white or black background, positioned at a slight angle rather than straight-on. This simple approach lets the jewelry shine without distractions. Rotate your piece to find the most flattering angle—typically showing the front details while hinting at dimension.
2. Floating Effect: Suspend necklaces and earrings using fishing line or thin wires, then remove them in post-processing. This creates a magical, weightless appearance that draws attention to the jewelry itself. For rings, use museum putty or double-sided tape to position them upright, then carefully remove any visible supports during editing.
3. Lifestyle Context: Show jewelry in use without necessarily using models. A necklace draped over a vintage book, a ring resting on a handwritten note, or earrings paired with a silk scarf tells a story without the complexity of a full photoshoot. This approach works exceptionally well for social media content.
4. The Group Formation: Arrange multiple pieces in geometric patterns. Create circles with rings, triangles with pendant necklaces, or cascading patterns with earrings. This works particularly well for collections and lookbooks, showing how pieces complement each other.
5. Nature Integration: Incorporate natural elements that complement your jewelry. Fresh flowers for delicate pieces, rough stones for rustic designs, or leaves for organic shapes. Just ensure these elements don’t overpower the jewelry—they should enhance, not distract.
6. Texture Contrast: Place jewelry against surfaces that create interesting texture contrasts. Rough wood with delicate chains, smooth marble with bold statement pieces, or soft fabrics with sharp geometric designs. The contrast adds visual interest and helps define the jewelry’s character.
7. The Mirror Effect: Use reflective surfaces like black acrylic, polished stone, or even water to create subtle reflections. This adds depth and sophistication, particularly for high-end pieces. Position your light source carefully to avoid unwanted reflections of your equipment.
8. Flat Lay Mastery: Arrange jewelry and complementary props from directly overhead. This technique, popular on Instagram and Pinterest, works best when you create clear zones within your composition—jewelry as the hero, props as supporting elements.
9. The Golden Ratio: Position your jewelry according to the golden ratio (approximately 1:1.618) rather than centering it. This creates naturally pleasing compositions that draw the viewer’s eye through the entire image. Many cameras and phones offer grid overlays to help with this.
10. Macro Detail Shots: Get extremely close to showcase craftsmanship. Capture the clasp mechanism, stone settings, or texture patterns. These detail shots build trust by showing quality and attention to detail. Use focus stacking for maximum sharpness throughout.
11. Color Harmony: Choose backgrounds and props that either complement or contrast with your jewelry’s colors. Monochromatic schemes create elegance, while complementary colors create vibrancy. A color wheel can help identify harmonious combinations.
12. Negative Space: Use empty space deliberately to create emphasis and sophistication. Small jewelry positioned in one-third of the frame, with the rest empty, creates dramatic, gallery-worthy images. This technique works particularly well for minimalist and high-end brands.
13. The Stack: Layer rings, bracelets, or necklaces to create depth and show how pieces work together. This is especially effective for collections and looks great in flat lays. Ensure each piece remains visible and doesn’t get lost in the stack.
14. Action Shots: Show jewelry in motion. A swinging necklace captured with a slow shutter speed, water droplets splashing near earrings, or powder puffing around a ring creates dynamic, engaging images that stand out in social feeds.
15. The Reveal: Create intrigue by partially obscuring your jewelry. A ring peeking from behind fabric, a necklace partially hidden by flowers, or earrings emerging from shadows creates curiosity and encourages closer inspection.
16. Geometric Backgrounds: Use patterns and shapes in your backgrounds to create visual interest. Subtle chevrons, soft circles, or linear elements can complement your jewelry’s design without overwhelming it.
17. The Box Shot: Photograph jewelry in or emerging from its packaging. This works particularly well for gift guides and holiday content, creating anticipation and showing the complete product experience.
18. Scale Reference: Include subtle elements that show size without being obvious. A coin next to a ring, a ruler edge along a necklace, or a finger near earrings helps viewers understand scale without being intrusive.
19. The Overhead: Shoot directly down at arranged jewelry. This perspective is flattering for most pieces and creates consistency across your product catalog. Use a tripod or mount your phone directly above for perfect alignment.
20. Seasonal Themes: Incorporate seasonal elements sparingly. Spring flowers with delicate pieces, autumn leaves with warm-toned gold, or snowflakes with winter jewelry creates timely content for marketing campaigns.
The right camera settings can make or break your jewelry photos. After countless test shoots and technical experiments, I’ve distilled the essential settings that consistently produce sharp, detailed images. The key is understanding how aperture, ISO, and focus work together in macro photography.
Aperture Control: Aperture determines your depth of field—how much of your jewelry is in focus from front to back. For small jewelry pieces, use f/8 to f/11 to ensure most of the piece is sharp. Larger pieces might require f/16 for complete sharpness, but avoid going higher than f/22 as diffraction can actually reduce sharpness. Remember that smaller apertures (higher f-numbers) require more light or longer exposures.
ISO Management: Keep your ISO as low as possible to maintain image quality and minimize noise. Use ISO 100-400 for best results. If you’re struggling with low light, increase exposure time rather than ISO—this is why a tripod is essential. Modern cameras can handle ISO 800-1600 if necessary, but avoid going higher unless you have no other choice.
Shutter Speed: With your camera on a tripod, shutter speed becomes less critical but still matters. Use 1/125s or faster to prevent any potential vibration, though you can go slower if needed. If you’re using studio strobes, your maximum sync speed (typically 1/200s to 1/250s) will be your limit. For continuous lighting, adjust until your exposure is perfect at your chosen aperture and ISO.
Focus Techniques: Manual focus is almost always better for jewelry photography. Use live view to magnify your subject and fine-tune focus on the most important element—usually the center stone or clasp mechanism. For critical shots, consider focus stacking: take multiple shots at different focus points and combine them in post-processing for perfect sharpness throughout.
⚠️ Important: Always use manual focus for jewelry photography. Autofocus systems struggle with the small size and reflective surfaces of jewelry, often focusing on the background or getting confused by reflections.
White Balance: Accurate color is crucial for jewelry—especially for metals and gemstones. Use a custom white balance rather than auto settings. For the most accuracy, photograph a gray card in your lighting setup and set that as your white balance reference. This ensures gold looks gold and silver looks silver, not yellow or blue.
File Format: Always shoot in RAW format. RAW files capture much more detail and dynamic range than JPEGs, giving you more flexibility in post-processing. The larger file size is worth it for the improved quality, especially when dealing with the fine details in jewelry.
| Setting | Recommended Value | Why It Matters |
|---|---|---|
| Aperture | f/8 – f/11 (small pieces) f/11 – f/16 (larger pieces) | Ensures adequate depth of field for sharpness |
| ISO | 100 – 400 (best quality) up to 800 if necessary | Minimizes noise and maintains image quality |
| Shutter Speed | 1/125s or faster (tripod) | Prevents vibration and ensures sharpness |
| Focus | Manual (using live view) | Precise control over focus point |
| White Balance | Custom (gray card) | Accurate color reproduction |
| File Format | RAW | Maximum detail and editing flexibility |
Focus Stacking Guide: For maximum sharpness, especially with larger pieces or complex jewelry:
Don’t have a professional camera? No problem. I’ve captured jewelry photos that sold for thousands using nothing more than an iPhone and household items. Modern smartphones have incredible cameras—if you know how to use them properly. Here’s how to maximize your phone’s potential for jewelry photography.
iPhone Specific Techniques: The iPhone 16 Pro and recent models have macro capabilities built-in. Switch to the 0.5x or 1x lens and move as close as possible—the phone will automatically switch to macro mode when you’re close enough. Use the 3x lens for smaller jewelry pieces to avoid distortion. Enable “Macro Control” in settings to manually switch between macro and regular mode.
Android Tips: Many Android phones have dedicated macro modes or ultra-wide lenses that work for close-ups. Check if your phone has a “Pro” mode for manual control over settings. Samsung’s recent Galaxy phones have excellent macro capabilities—look for the flower icon in the camera app. Remember to clean your lens before shooting—fingerprints are more noticeable at close distances.
Essential Mobile Apps: While your phone’s native camera is capable, specialized apps can enhance your jewelry photography:
DIY Smartphone Accessories: Stabilize your phone with a tripod and smartphone mount. Create a DIY light tent using a white plastic storage bin turned upside down. Use reading glasses as macro lenses—hold them over your phone’s camera lens for magnification. A simple binder clip can serve as a makeshift phone stand for overhead shots.
Lighting for Smartphone Photography: Phones work best with abundant light. Position yourself near a window or use desk lamps with parchment paper as diffusers. Avoid using the built-in flash—it creates harsh, direct light that accentuates imperfections. Consider investing in a small LED light panel or ring light designed for phone use.
✅ Pro Tip: Use your phone’s burst mode when handholding jewelry shots. Hold your breath and gently press the shutter—you’ll capture multiple images and can select the sharpest one.
Limitations and Workarounds: Smartphones struggle with extreme close-ups and have limited optical zoom. Digital zoom degrades image quality—avoid using it. Instead, crop in post-processing or get physically closer to your subject. Manual focus control is limited on most phones—lock focus by tapping and holding on your screen.
Composition Tips for Mobile: Use your phone’s grid overlay for better composition. The square format (1:1) works particularly well for social media. Experiment with portrait mode to create background blur, though results can be inconsistent with small objects. Remember that phone lenses are wide-angle—get closer than you think you need to fill the frame with your jewelry.
Even the best jewelry photos benefit from careful post-processing. Editing can transform good photos into great ones, enhancing details without creating unrealistic representations. I’ve developed a workflow that balances efficiency with quality, whether you’re editing 100+ e-commerce shots or perfecting a single portfolio piece.
Basic Adjustments: Start with exposure and white balance. Fine-tune your exposure to ensure bright but not blown-out highlights—especially important for silver and white gold. Adjust shadows to reveal detail without appearing unnatural. Boost contrast slightly to add dimension, but avoid over-processing that creates harsh transitions.
Color Correction: Accurate color is non-negotiable for jewelry. Use the white balance dropper on a neutral area of your image, or manually adjust temperature and tint until metals look true to life. For gold jewelry, watch for yellow casts—gold should look golden, not orange. Silver should appear silver, not blue or purple.
Sharpening and Clarity: Apply sharpening carefully—over-sharpening creates halos around edges and looks artificial. Use masking to limit sharpening to important areas like edges and stone facets. Clarity can add mid-tone contrast and definition, but use sparingly—too much creates a crunchy, over-processed look.
Spot Healing and Cleanup: Remove dust, fingerprints, and minor imperfections using the spot healing brush or clone stamp. Be careful not to over-edit—minor imperfections can add authenticity to handmade jewelry. Clean up background distractions and ensure consistency across your product catalog.
Background Removal: For e-commerce, pure white backgrounds are often required. Use selection tools to isolate your jewelry, then create a pure white background. Feather the selection slightly to avoid harsh edges. For complex shapes, use the pen tool for precise control—this takes time but produces professional results.
⏰ Time Saver: Create presets or actions for common adjustments when editing multiple jewelry pieces. This ensures consistency across your catalog and dramatically speeds up your workflow.
Software Recommendations:
Advanced Techniques: For professional results, learn frequency separation to retouch without losing texture. Use dodging and burning to enhance dimension and create depth. Focus stacking software like Helicon Focus can combine multiple images for perfect sharpness throughout. Consider learning basic compositing to create complex product shots that would be impossible to capture in-camera.
Export Settings: Save edited images as high-quality JPEGs for web use. Use sRGB color space for consistency across devices. Resize to appropriate dimensions for your platform—Instagram works best with 1080px square images, while e-commerce sites might require larger files. Always keep an untouched original file for future use.
After analyzing thousands of jewelry photos and consulting with jewelry makers worldwide, I’ve identified the most common mistakes that plague photographers at all levels. Avoiding these pitfalls will dramatically improve your results and save you hours of frustration in post-processing.
1. Insufficient Cleaning: Jewelry attracts dust, fingerprints, and fibers. Clean every piece thoroughly with a microfiber cloth before shooting. For extra shine, use jewelry cleaner or a gentle soap solution, then dry completely. Use compressed air to remove stubborn dust particles—especially important for macro shots where every speck is visible.
2. Poor Focus Management: Nothing ruins a jewelry photo faster than missed focus. Always use manual focus and magnify to check critical sharpness. For larger pieces, use focus stacking to ensure sharpness throughout. When in doubt, bracket your focus points and select the best image later.
3. Harsh Lighting: Direct light creates harsh reflections and hot spots on jewelry. Use diffusion material like tracing paper, frosted plastic, or professional diffusers to soften light sources. Larger light sources create softer shadows—move lights closer or use larger modifiers for better results.
4. Inconsistent Backgrounds: Variation in backgrounds across your catalog looks unprofessional. Use consistent materials and lighting for product photography. Keep backup materials on hand to ensure you can replicate your setup for future shoots.
5. Color Inaccuracy: Auto white balance often fails with jewelry’s reflective surfaces. Use custom white balance settings based on a gray card or known neutral. Calibrate your monitor to ensure what you see matches reality. This is especially crucial for accurately representing metal colors and gemstone hues.
6. Over-editing: It’s easy to go too far in post-processing, creating images that look fake and untrustworthy. Subtlety is key—enhance reality rather than replacing it. Step away from your editing periodically and return with fresh eyes to avoid over-processing.
7. Wrong Camera Angles: Shooting jewelry from the wrong angle can distort proportions and hide important details. Experiment with different angles to find each piece’s best perspective. Generally, shoot at 45-degree angles rather than straight-on or completely top-down unless required by your platform.
8. Ignoring Scale: Customers can’t judge size from photos alone. Include scale references when appropriate, or ensure your product descriptions include dimensions. Consistent sizing across catalog photos helps customers understand relative sizes.
9. Poor Composition: Centered shots are boring and lack visual interest. Use the rule of thirds, create flow with diagonal lines, and use negative space deliberately. Guide the viewer’s eye through the image to tell a story about your jewelry.
10. Rushing the Process: Great jewelry photography takes time. Set up your equipment properly, test your lighting, and take multiple shots from different angles. Rushed work shows in the final images—plan adequate time for each piece, especially when starting out.
The best way to photograph jewelry combines soft, diffused lighting with a sturdy tripod and manual focus. Use a light tent or natural window light to minimize reflections, set your aperture to f/8-f/11 for adequate depth of field, and shoot in RAW format for maximum editing flexibility. Clean your jewelry thoroughly and experiment with angles to find each piece’s best perspective.
Use aperture priority or manual mode with f/8-f/11 aperture for sharp focus throughout. Keep ISO low (100-400) for best quality, and use a tripod to allow slower shutter speeds as needed. Set white balance manually using a gray card for accurate colors. Always use manual focus, magnifying with live view to ensure precise focus on important details.
Use the macro mode on iPhone 13 Pro or newer models, moving close until the macro icon appears. Enable grid overlay for better composition and use the 2x or 3x lens to avoid distortion. Stabilize your phone with a tripod, use abundant natural light, and edit with apps like Snapseed or Adobe Lightroom Mobile. Clean your lens thoroughly and use burst mode to select the sharpest image.
Essential equipment includes a camera with manual controls (or modern smartphone), a macro lens or close-up capability, a sturdy tripod, and soft lighting equipment. A light tent ($20-200) is highly valuable for beginners. Optional but helpful: remote shutter release, reflector cards, and editing software. Many professionals create stunning images with under $200 in total equipment.
Use soft, diffused lighting from large sources like softboxes or through a light tent. Position black cards strategically to create intentional dark reflections that define edges. For highly reflective pieces, try indirect lighting or use polarizing filters on your lights. Control your environment by covering reflective surfaces and wearing dark, non-reflective clothing during shoots.
White backgrounds work best for e-commerce consistency, while black creates drama and contrast for silver and diamonds. Marble, wood, and textured fabrics add personality for artistic shots. Choose backgrounds that complement rather than compete with your jewelry. Keep a selection of consistent backgrounds for catalog work to maintain professional appearance across your product line.
After helping hundreds of jewelry makers and photographers perfect their craft, I’ve learned that great jewelry photography is part science, part art, and entirely achievable with practice. Start with the basics—good lighting and a clean piece of jewelry—then gradually build your skills and equipment as needed.
Remember that consistency matters more than perfection. Develop a repeatable workflow that you can execute reliably, whether you’re shooting one piece or one hundred. Document your setup with photos and notes so you can replicate successful results. Most importantly, practice regularly and don’t be afraid to experiment—the most striking jewelry photos often come from creative risks and unexpected discoveries.
Jewelry photography is a journey, not a destination. Each piece presents unique challenges and opportunities to create beautiful images that drive sales and delight customers. Armed with these techniques and ideas, you’re ready to capture jewelry that truly sparkles and shines. Now grab your camera (or phone), find some good light, and start creating images that do your jewelry justice.