![20 Fascinating Drone Facts That Will Blow Your Mind [cy]](https://revellphotography.com/wp-content/uploads/2026/09/featured-update-4101-1789404624208.jpg)
20 Fascinating Drone Facts You Should Know (September 2026)
Discover 20 fascinating drone facts that showcase the evolution from military technology to everyday tools. Learn about drone capabilities, regulations,…

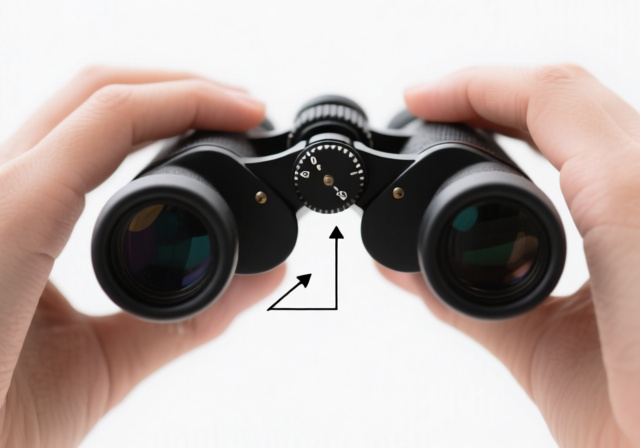
If you’ve ever raised a new pair of binoculars to your eyes and seen a doubled, fuzzy mess instead of a crisp scene, you’re not alone. Forum threads on r/Binoculars and birding communities overflow with the same complaint: “I’ve followed every guide and one side still won’t sharpen.” The gap almost always comes back to the diopter ring, not the central focus wheel.
This guide to how to focus binoculars breaks the process into four steps you can complete in under a minute: set the interpupillary distance, choose your target, focus your dominant eye using the central focus wheel, then fine-tune the diopter ring on the opposite eyepiece. Each step is explained with the reasoning behind it so you can adapt the method to any binocular model.
Below I’ll walk through the parts of a binocular that control focus, share the trick astronomers use to mark infinity focus with tape, and cover the troubleshooting scenarios that frustrate first-time users, including close-focus limits, drifting diopters, and the headaches that signal your IPD or diopter is slightly off. Whether you’re wearing glasses, hunting, or setting up your first pair for backyard birding, the techniques here will give you a sharper, more comfortable view.
Binocular focusing happens through two systems working in tandem: a shared distance adjustment and a personal eye-difference adjustment. When you understand what each control does, the focusing steps stop feeling like guesswork and start feeling like a repeatable process.
The central focus wheel is the large ridged knob between the barrels. Rotating it moves both optical tubes at the same time, so it handles every distance change from your minimum focus distance out to infinity. Most wheels rotate through several full turns, giving you the fine control you need for precise focus on a perched bird or a distant ridgeline.
The diopter ring lives on top of one eyepiece, almost always the right one, and only adjusts that single barrel. It corrects the difference in prescription between your two eyes. Since most people have slightly asymmetric vision, this small ring is what makes the image snap into focus for both eyes simultaneously.
The interpupillary distance hinge is the bridge where the two barrels meet. Pivoting the barrels inward or outward changes the spacing between eyepieces so each one lines up with your pupil. If you see two overlapping circles instead of one clean circle, the hinge needs adjustment. Understanding binocular numbers matters here: a 10×42 pair will demand tighter IPD accuracy than an 8×42 because the higher magnification amplifies any misalignment.
The eyecups control eye relief, which is the distance your eye sits behind the eyepiece. Twist-up or fold-down rubber eyecups let you set that distance for glasses wearers (who need extra room) and non-glasses users (who benefit from the cup pressing gently against the brow). Get the eye relief wrong and you’ll see black crescents around the edges of your view.
Two focusing styles exist across binocular models. Center-focus binoculars, the most common type, use the central wheel plus a diopter ring for fine-tuning. Individual-focus binoculars, often found in marine and military applications, have no central wheel at all; you rotate each eyepiece independently. If you own an IF binocular, the diopter step in the standard procedure simply doesn’t apply, and you’ll set each eye in turn with its own eyepiece ring. For a deeper look at the optics behind these systems, see binocular components explained.
Pick a stationary object about 20 to 50 yards away with sharp edges. A roofline, a sign, or a tree branch against open sky works perfectly. Avoid blank walls, plain sky, and moving targets; the procedure needs a clear focus reference to lock onto.
Step 1: Adjust the interpupillary distance and eyecups.
Step 2: Focus your dominant eye with the central focus wheel.
Step 3: Adjust the diopter ring for your other eye.
Step 4: Verify and fine-tune.
Pro tip: Run through these four steps two or three times in a row. After a single sitting, most people can set up a new pair of binoculars in under 30 seconds without thinking about it.
Your diopter setting belongs to your eyes alone. If someone else uses the binoculars, expect to redo Step 3 when you get them back. This is why serious birders and astronomers treat the diopter as a personal calibration and rarely loan their optics out.
The diopter ring is the most-misunderstood control on a binocular and the single biggest reason people give up on otherwise excellent optics. Once you understand what it actually does, the rest of the focusing procedure clicks into place.
The word diopter refers to a unit of optical power. In binoculars, the diopter ring adds or subtracts up to roughly plus or minus three diopters of correction from the right eyepiece, enough to handle the vast majority of vision differences between eyes. It’s not a focus knob; it doesn’t track distance. It’s a one-time calibration that compensates for the fact that your eyes aren’t identical.
You’ll need to set or reset the diopter in a few predictable situations. The first time you set up a new pair. After a friend or family member borrows them. When your glasses prescription changes or you switch between contacts and glasses. Some experienced users even keep slightly different diopter settings for different activities: a touch sharper for astronomy, a touch softer for long birding walks.
Forum users with strong prescription differences frequently report their diopter lands way off center, close to the plus or minus limit. This is normal. If your right eye needs significantly more correction than your left, the ring simply has to travel further to deliver it. A setting near the edge of the range is not a defect in the binocular; it’s a sign your eyes need real correction.
Diopters can drift over time as the ring loosens. If yours seems to lose sharpness during a long session, try the slightly-pull-up trick mentioned on r/Binoculars: while looking through the binoculars, gently lift the right eyepiece a hair at a time until focus returns. If the ring needs pulling every outing, it’s a calibration issue that a service center can usually correct in minutes.
The most common diopter mistake is using the ring to track distance. The central focus wheel exists for that. Reserve the diopter for your personal eye-difference correction only, and you’ll avoid headaches that come from asymmetric eye strain over a long afternoon of viewing.
For long sessions, take a moment to relax your eyes before setting the diopter. Strained or squinting eyes give a misleading reading, and you’ll feel the fatigue twenty minutes into a hike. Drop your shoulders, breathe, and let your eyes settle into their natural resting focus before making the adjustment.
Glasses add roughly 10 to 15 millimeters of distance between your eye and the eyepiece. That gap is the entire reason eye relief exists, and getting it wrong is the leading cause of “I can’t see the full circle” complaints from glasses wearers.
Twist the eyecups fully down before you put the binoculars to your face. The down position moves the focal plane outward to compensate for the extra space, so the full field of view clears up. If you leave the cups up while wearing glasses, you’ll see a small black ring around the image and may assume the binoculars are defective. They aren’t; the eyecups just need to retract.
Your diopter setting will land in a different spot with glasses than without. Pick one method and stay with it. If you always view with glasses on, set the diopter with glasses on. If you sometimes remove your glasses for a quick look, the diopter won’t be quite right for that session. The confusion causes most of the “my binoculars won’t focus today” complaints from glasses wearers, not a defect in the optics.
Long eye relief matters when you wear glasses. Look for binoculars rated at 17 millimeters or more of eye relief; 18 to 20 millimeters is comfortable. Compact binoculars with very small eyecup travel can technically be used with glasses but get uncomfortable quickly. Premium models from Nikon, Vortex, and Swarovski publish eye relief in their specs for exactly this reason.
For a detailed look at eyecup styles, frame compatibility, and the trade-offs between twist-up and fold-down designs, see our guide on using binoculars with glasses. It walks through the long-term comfort adjustments that matter once you’re spending hours in the field.
Most binocular complaints trace back to a small handful of root causes. Walking through these in order usually fixes the issue in under five minutes.
Can’t get a sharp image at any distance. Reset the diopter using the single-eye method from Step 3. If the image is still soft, clean the lenses with a microfiber cloth and proper optical cleaning solution; smudges look identical to misfocus. Also check that you’re not trying to focus closer than the binocular’s minimum focus distance. Porro-prism models often won’t focus closer than about 20 feet, while roof-prism designs typically reach 6 to 8 feet.
Double vision or ghost images. Three causes cover almost every case: an off diopter, a wrong IPD, or an out-of-collimation binocular. First reset the diopter. Then check the IPD by looking at a bright sky; you should see one perfect circle, not two overlapping ones. If the double image persists after both adjustments, the optics may be misaligned. A simple at-home test: focus on a horizontal line like a roof edge. If the line jumps up or down as you cover one eye at a time, the binocular needs professional recollimation.
Blacked-out areas or tunnel vision. Your eye is sitting the wrong distance from the eyepiece. Glasses wearers need eyecups down. Non-glasses users need them fully extended. Move your head slightly forward and back until the full circle appears with no dark crescents. Extreme IPDs (very narrow or wide faces) can also cause vignetting in some designs; if the issue doesn’t resolve with eyecup adjustment, your face geometry may simply not match the binocular’s optimal range.
Focus drifts during use. A small focus shift when you change IPD or move the wheel quickly is normal. A focus that won’t hold position is mechanical. In cold weather, focus knobs stiffen up; let the binoculars acclimate to the ambient temperature for ten minutes before expecting smooth operation. Cheap focus mechanisms can also slip; if the knob won’t stay put, the binocular is overdue for replacement or repair.
One eye sharper than the other. Almost always a diopter problem. Cover each eye in turn and adjust until both see equally sharp images. If the imbalance only shows up after switching between glasses and contacts, you’re seeing the diopter-versus-prescription mismatch mentioned earlier; pick one method and stick with it.
Headaches after extended use. This is the symptom forum users complain about most, and it almost always points to a slightly off diopter or IPD. Even a half-diopter of asymmetry between eyes creates real muscle tension over an hour of viewing. Reset both, and if the headaches continue, consider getting your binocular’s IPD measured by a professional rather than eyeballed.
Once the basic four steps feel automatic, a few field-tested habits can sharpen your performance for specific activities. Most are small adjustments to the standard procedure.
Birders benefit from pre-focusing at typical viewing distance. Before a walk, set your central focus on a target roughly 30 to 50 feet away. When a bird pops up, you’ll already be in the right neighborhood and only need a fraction of a wheel rotation to land on focus. Birds rarely sit still for long, and shaving a second off acquisition time matters.
Astronomers use a tape trick. During daylight, focus on the most distant object available, often a far ridgeline or a high cloud edge. Place a piece of painter’s tape on the barrel at that setting. At night, dial to the tape mark and you’re at infinity without fumbling with the wheel in the dark. Combine this with the standard four-step procedure at twilight and you’ll be ready for the stars.
Hunters often focus at their expected shooting distance and keep both eyes open. The open-eye technique preserves your situational awareness while the target stays sharp. It’s worth practicing with a stationary target before relying on it in the field.
For digiscoping (photographing through a binocular with a phone or camera adapter), focus slightly beyond perfect visual focus. Camera sensors and human eyes don’t focus at exactly the same plane, so a tiny extra twist of the wheel gives a sharper photo. Take a few test shots and adjust from there.
Temperature and altitude affect focus more than most users realize. Cold air stiffens focus mechanisms and changes how light bends through the glass; let binoculars acclimate for ten minutes before expecting smooth operation. At altitude, thinner air and stronger UV can shift your ideal focus point slightly. Some mountaineers keep notes on their diopter settings at different elevations.
Keep the focus mechanism clean. Dust and grit inside the central wheel cause rough operation and inconsistent focus. Regular binocular maintenance, especially around the hinge and focus wheel, keeps the action smooth for years. Avoid spraying anything near the focus mechanism; a soft brush and microfiber cloth are safer than compressed air.
Some users with strong vision differences try a reverse-diopter approach: they leave the right eyepiece alone and adjust the left, using the right for central focus instead. Most binocular designs place the diopter on the right by convention, but the goal is sharp focus in both eyes, and the convention can be flipped if it suits your vision better. Compare the experience of using binoculars to binoculars vs monocular setups too; many focusing instincts transfer cleanly between the two.
Three things cause this most often: an off diopter setting, dirty lenses, or trying to focus closer than the binocular’s minimum focus distance. Reset the diopter using the single-eye method, clean your lenses with a microfiber cloth and proper optical solution, and confirm your target sits beyond the minimum focus distance (often 10 to 20 feet depending on the design). If the image stays soft across all distances, the binocular likely needs professional recollimation or repair.
Double vision usually traces to one of three causes: incorrect diopter adjustment, wrong interpupillary distance, or optical misalignment (collimation). First reset the diopter using the single-eye method. Then check the IPD by looking at a bright sky and pivoting the barrels until you see one clean circle. If double images persist across both adjustments, your binoculars may be out of collimation and need professional service.
Set the interpupillary distance first so the two circles merge into one. Pick a target 20 to 50 yards away with clear edges. Cover the right eye, then focus the left using only the central focus wheel. Cover the left eye and adjust the right using only the diopter ring, without touching the central wheel. Open both eyes and verify the image is sharp. After this, the central focus wheel handles all distance changes on its own.
Cover the right objective lens with a lens cap or your hand. Focus on a distant stationary object using only the central focus wheel until your left eye sees it sharply. Now cover the left objective lens, uncover the right, and rotate the diopter ring on the right eyepiece until the same object looks equally sharp. Do not touch the central focus wheel during this step. Note or mark your diopter setting for future reference.
Twist the eyecups fully down before raising the binoculars to your face, since glasses add roughly 10 to 15mm of distance from the eyepiece. Run the standard four-step procedure with your glasses on. Look for binoculars rated at 17mm or more of eye relief for comfortable long sessions. Stick with one method (always with glasses, or always without) to avoid diopter confusion.
Start by pivoting the barrels at the central hinge until you see one perfect circle instead of two. Set the eyecups to the correct position for glasses (down) or no glasses (up). Choose a stationary object 20 to 50 yards away. Cover the right eye and focus the left with the central focus wheel. Cover the left eye and adjust the right with the diopter ring only. Open both eyes and verify the image is sharp.
A blurry right eyepiece almost always means the diopter needs adjusting. Re-run Step 3 of the standard procedure: cover the left lens, focus the right with the diopter ring only (do not touch the central focus wheel), and verify the image sharpens. If it stays blurry, your right eye may need more correction than the diopter range can provide, or the binocular itself may be out of collimation and need service.
Every binocular has a minimum focus distance, the closest point at which it can produce a sharp image. Porro-prism designs typically won’t focus closer than about 20 feet; roof-prism binoculars usually reach 6 to 8 feet. Check your model’s specs for its minimum focus. If you need to view closer than that (for insects, butterflies, or reading signs), look for a binocular specifically marketed as close-focus, with a minimum focus distance under 6 feet.
Sharp binocular focus comes down to two habits: setting the diopter once and correctly, and using only the central focus wheel for every distance change after that. Master that distinction and you’ll never wrestle with a doubled, blurry image again. The four-step procedure above works on virtually any center-focus binocular, from compact 8×25 travel pairs to full-size 10×42 birding optics.
Give yourself permission to repeat the steps a few times during your first session. Even experienced users occasionally need to nudge the diopter back into place after lending their binoculars, switching between glasses and contacts, or moving between drastically different altitudes. The procedure takes under a minute once practiced, and it pays you back every time you raise the binoculars to your eyes.
For most people, the biggest unlock is realizing that the diopter is a one-time personal calibration, not a focus knob. Once you stop trying to use it for distance and treat it as the eye-difference compensator it actually is, focusing becomes a single-wheel task. If you’re still stuck after running the procedure twice, the issue is almost certainly IPD or collimation, both of which are easier to diagnose once you know what to look for.
Take the four steps outside on a clear day, point at a roofline 30 yards away, and run through them out loud. By the second or third pass, you’ll find yourself setting up binoculars faster than you ever expected, and the views will be sharper than you remembered. Practice is the part no guide can replace.
![Best Thermal Binoculars Monoculars [cy]: Complete Guide](https://revellphotography.com/wp-content/uploads/2026/09/featured-update-3816-1789404478654.jpg)
![Best Birding Blogs [cy]: Top Resources for Bird Enthusiasts](https://revellphotography.com/wp-content/uploads/2026/09/featured-update-2168-1789403090398.jpg)
![Best Low Light Binoculars [cy]: Expert Testing Results](https://revellphotography.com/wp-content/uploads/2026/09/featured-update-660-1789231076311.jpg)